Admin Dashboard User Guide
This guide explains how to use the UniSync Admin Dashboard to manage instructors, routines, and exam schedules.
Table of Contents
Understanding Key Concepts
Before using the admin dashboard, it's important to understand the core academic concepts in UniSync:
Academic Structure
Department
An academic department within the institution (e.g., Computer Science & Engineering, Electrical Engineering).
Course
A course from the course catalog that defines:
- Course Code: Unique identifier (e.g., CSE 3215, PHY 1101)
- Course Name: Full name (e.g., "Object Oriented Programming")
- Credit Hours: Academic credits (e.g., 3.0)
- Semester: Which semester the course is typically offered (e.g., 5th semester)
- Course Type: THEORY, LAB, or PROJECT
Batch
A group of students who enrolled in the same academic year:
- Name: Identifier (e.g., "Batch 65", "2023")
- Department: Which department the batch belongs to
- Current Semester: Which semester they're currently in
- Year: Enrollment year
- Start/End Date: Academic period
Section
A subdivision of a batch for organizing students into smaller groups:
- Name: Section identifier (e.g., "A", "B", "65A", "65B")
- Batch: Which batch this section belongs to
- Capacity: Maximum number of students
Course Offering
This is the most important concept - A course offering represents a specific instance of a course being taught to a particular section/batch in a specific academic year.
Think of it as: "Course X is being taught to Section Y of Batch Z in Academic Year 2024-2025 by Teacher T"
Example:
- Course: CSE 3215 (Object Oriented Programming)
- Batch: Batch 65
- Section: Section B
- Teacher: Md. Ajiarul Islam Miraj
- Academic Year: 2024-2025
This creates one Course Offering that can be used for:
- Creating routine entries (weekly schedule)
- Scheduling exams
- Tracking attendance
- Managing assignments
Why Course Offerings Matter:
- The same course (e.g., CSE 3215) can be offered to multiple sections
- Each section may have different teachers
- Each offering has its own schedule and exams
- Students are enrolled in specific course offerings, not just courses
Event System
Routine
A recurring weekly schedule entry that defines regular class sessions:
- Name: Descriptive name (e.g., "CSE 3215 Monday Lecture")
- Course Offering: Links to a specific course offering
- Day of Week: Which day (0=Sunday, 1=Monday, etc.)
- Start/End Time: Class timing
- Event Type: lecture, lab, tutorial, exam, other
- Effective Period: Date range when this routine is active
- Status: Active or Inactive
Event
A specific occurrence of a scheduled activity:
- Event Type: exam, lecture, lab, meeting, etc.
- Title: Event name
- Course Offering: Optional link to course offering
- Date: Specific date
- Start/End Time: Event timing
- Status: scheduled, ongoing, completed, cancelled
- Priority: normal, high, urgent
- Routine: Optional link if generated from a routine
Event Room
Assigns physical rooms/venues to events (supports multiple rooms per event):
- Event: Which event this is for
- Room: Physical room from venue system
- Capacity: Room capacity
- Is Primary Room: Main room indicator
Event Instructor
Assigns instructors to specific event rooms (supports multiple instructors):
- Event Room: Which room assignment
- Instructor: Teacher/instructor account
- Role: Teaching role (e.g., "Primary Instructor", "Lab Assistant")
- Is Primary: Main instructor indicator
Venue System
Building
Physical buildings on campus:
- Name: Building name
- Code: Short identifier
- Address: Location
- Coordinates: Latitude/Longitude
Room
Individual rooms within buildings:
- Building: Which building
- Room Number: Room identifier
- Floor: Floor level
- Room Name: Descriptive name
- Capacity: Maximum occupancy
- Facilities: JSON data for equipment/features
Managing Instructors
Instructors are users with teaching privileges in the system. Each instructor has an account and an optional profile.
Adding a New Instructor
Navigate to Instructor Management
- Go to Dashboard → Instructor
Click "Add Instructor" Button
Fill in Account Information:
- Phone: 11-digit phone number (e.g., 01712345678)
- This is the primary login identifier
- Cannot be changed after creation
- Email: Optional email address
- Password: Minimum 6 characters (required for new accounts)
- Role: Select either:
- Instructor: Regular teaching staff
- Admin: Full administrative access
- Active: Toggle to enable/disable the account
- Phone: 11-digit phone number (e.g., 01712345678)
Click "Create"
Adding Instructor Profile
After creating an instructor account, you should add their profile information:
Find the instructor in the list
Click "Profile" button
Fill in Profile Details:
- First Name: Instructor's first name (e.g., "Md. Ajiarul Islam")
- Last Name: Instructor's last name (e.g., "Miraj")
- Employee/Instructor ID: Optional employee identifier
- Date of Birth: Optional
- Address: Optional full address
Click "Create" or "Update"
Editing Instructors
- Edit Account: Click "Edit" to modify email, role, or active status
- Edit Profile: Click "Profile" to update personal information
Example: Creating an Instructor
Scenario: Add instructor "Md. Ajiarul Islam Miraj" who teaches CSE courses
Step 1 - Create Account:
Phone: 01712345678
Email: miraj@university.edu
Password: secure123
Role: Instructor
Active: ✓ (checked)
Step 2 - Add Profile:
First Name: Md. Ajiarul Islam
Last Name: Miraj
Employee ID: CSE-001
Date of Birth: 1985-05-15
Address: Dhaka, Bangladesh
Managing Routines
Routines define the weekly recurring schedule for classes. They automatically generate events for the specified period.
Prerequisites
Before creating routines, ensure you have:
- ✓ Created the course in the system (e.g., CSE 3215)
- ✓ Created the batch (e.g., Batch 65)
- ✓ Created the section (e.g., Section B)
- ✓ Created the instructor account
- ✓ Created a Course Offering linking course + batch + section + teacher
Adding a Routine
Navigate to Routine Management
- Go to Dashboard → Routine → Routines tab
Click "Add Routine" Button
Fill in Routine Details:
Name: Descriptive identifier
- Example: "CSE 3215 Monday Lecture"
- Example: "CSE 3217 Sunday Lab"
Course Offering: Select from dropdown
- Shows format:
COURSE_CODE - COURSE_NAME (SECTION / BATCH) - Example: "CSE 3215 - Object Oriented Programming (B / Batch 65)"
- Shows format:
Day of Week: Select the day
- Sunday, Monday, Tuesday, Wednesday, Thursday, Friday, Saturday
Start Time: Class start time (24-hour format)
- Example: 09:00
End Time: Class end time (24-hour format)
- Example: 10:20
Event Type: Select type
- Lecture: Regular theory class
- Lab: Laboratory session
- Tutorial: Tutorial/problem-solving session
- Exam: Examination
- Other: Other activities
Effective From: Start date for this routine
- Example: 2025-01-01
Effective To: End date for this routine
- Example: 2025-06-30
Active: Toggle to enable/disable
- ✓ Active routines generate events
- ✗ Inactive routines are ignored
Click "Create"
Example: Creating a Weekly Class Schedule
Based on the routine table image you provided, here's how to create the schedule:
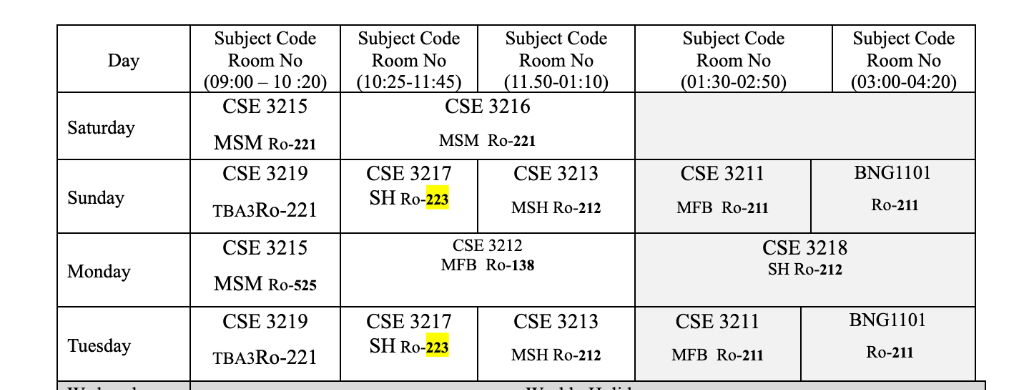
Saturday Schedule
Routine 1:
Name: CSE 3215 Saturday Morning
Course Offering: CSE 3215 - (MSM / Batch 65)
Day of Week: Saturday
Start Time: 09:00
End Time: 10:20
Event Type: Lecture
Effective From: 2025-01-01
Effective To: 2025-06-30
Active: ✓
Routine 2:
Name: CSE 3216 Saturday Late Morning
Course Offering: CSE 3216 - (MSM / Batch 65)
Day of Week: Saturday
Start Time: 10:25
End Time: 11:45
Event Type: Lecture
Effective From: 2025-01-01
Effective To: 2025-06-30
Active: ✓
Sunday Schedule
Routine 1:
Name: CSE 3219 Sunday Morning
Course Offering: CSE 3219 - (TBA3 / Batch 65)
Day of Week: Sunday
Start Time: 09:00
End Time: 10:20
Event Type: Lecture
Effective From: 2025-01-01
Effective To: 2025-06-30
Active: ✓
Routine 2:
Name: CSE 3217 Sunday Lab
Course Offering: CSE 3217 - (SH / Batch 65)
Day of Week: Sunday
Start Time: 10:25
End Time: 11:45
Event Type: Lab
Effective From: 2025-01-01
Effective To: 2025-06-30
Active: ✓
Routine 3:
Name: CSE 3213 Sunday Midday
Course Offering: CSE 3213 - (MSH / Batch 65)
Day of Week: Sunday
Start Time: 11:50
End Time: 01:10
Event Type: Lecture
Effective From: 2025-01-01
Effective To: 2025-06-30
Active: ✓
Routine 4:
Name: CSE 3211 Sunday Afternoon
Course Offering: CSE 3211 - (MFB / Batch 65)
Day of Week: Sunday
Start Time: 01:30
End Time: 02:50
Event Type: Lecture
Effective From: 2025-01-01
Effective To: 2025-06-30
Active: ✓
Routine 5:
Name: BNG1101 Sunday Late Afternoon
Course Offering: BNG1101 - (Section / Batch 65)
Day of Week: Sunday
Start Time: 03:00
End Time: 04:20
Event Type: Lecture
Effective From: 2025-01-01
Effective To: 2025-06-30
Active: ✓
Managing Routines
- Edit: Click "Edit" to modify routine details
- Copy: Click "Copy" to duplicate a routine (useful for similar schedules)
- Delete: Click "Delete" to remove a routine
- Filter: Use table filters to find specific routines
Routine Exceptions
For one-time schedule changes (holidays, makeup classes), use the "Routine Exceptions" tab to:
- Cancel specific routine occurrences
- Reschedule classes
- Add special events
Managing Exam Schedules
Exam schedules are created as Events with type "exam". They can be linked to course offerings and assigned to rooms with invigilators.
Prerequisites
Before scheduling exams, ensure you have:
- ✓ Created course offerings
- ✓ Created instructor accounts (for invigilators)
- ✓ Created buildings and rooms in the venue system
Creating an Exam Event
Currently, exam events are managed through the Events system. Here's the conceptual workflow:
- Create Event with type "exam"
- Link to Course Offering
- Set Date and Time
- Assign Rooms (via Event Room)
- Assign Invigilators (via Event Instructor)
Example: Creating an Exam Schedule
Based on the exam schedule image you provided:
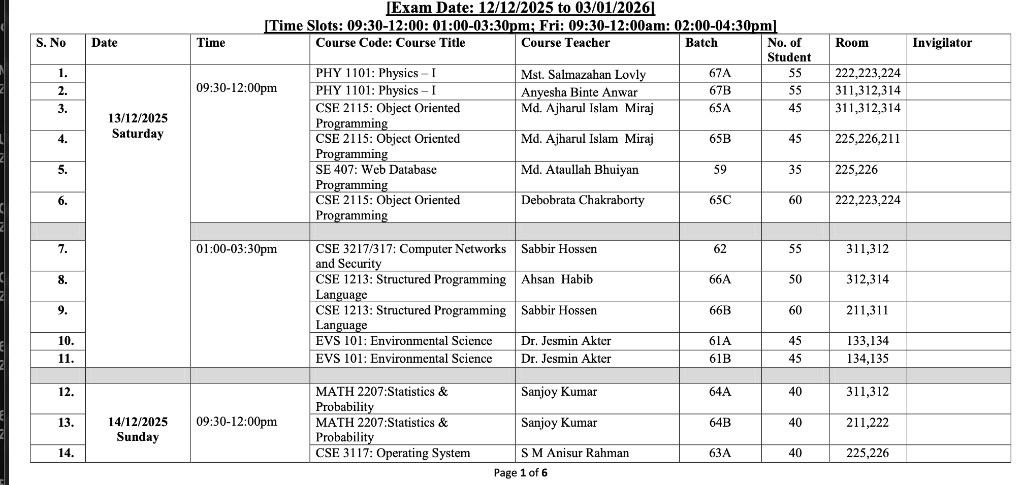
Exam Details from Image
Exam 1: PHY 1101 - Physics I
Event Details:
- Title: PHY 1101: Physics – I
- Event Type: exam
- Course Offering: PHY 1101 (Batch 67A)
- Date: 2025-12-13 (Saturday)
- Start Time: 09:30
- End Time: 12:00
- Status: scheduled
- Priority: high

Event Room 1:
- Room: Room 222,223,224
- Capacity: 55
- Is Primary Room: ✓

Event Instructor 1:
- Instructor: Mst. Salmazahan Lovly
- Role: Invigilator
- Is Primary: ✓
Exam 2: PHY 1101 - Physics I (Another Batch)
Event Details:
- Title: PHY 1101: Physics – I
- Event Type: exam
- Course Offering: PHY 1101 (Batch 67B)
- Date: 2025-12-13 (Saturday)
- Start Time: 09:30
- End Time: 12:00
- Status: scheduled
- Priority: high

Event Room 1:
- Room: Room 311,312,314
- Capacity: 55
- Is Primary Room: ✓

Event Instructor 1:
- Instructor: Anyesha Binte Anwar
- Role: Invigilator
- Is Primary: ✓
Exam 3: CSE 2115 - Object Oriented Programming
Event Details:
- Title: CSE 2115: Object Oriented Programming
- Event Type: exam
- Course Offering: CSE 2115 (Batch 65A)
- Date: 2025-12-13 (Saturday)
- Start Time: 09:30
- End Time: 12:00
- Status: scheduled
- Priority: high

Event Room 1:
- Room: Room 311,312,314
- Capacity: 45
- Is Primary Room: ✓

Event Instructor 1:
- Instructor: Md. Ajiarul Islam Miraj
- Role: Invigilator
- Is Primary: ✓
Exam 4: CSE 2115 - Object Oriented Programming (Another Section)
Event Details:
- Title: CSE 2115: Object Oriented Programming
- Event Type: exam
- Course Offering: CSE 2115 (Batch 65B)
- Date: 2025-12-13 (Saturday)
- Start Time: 09:30
- End Time: 12:00
- Status: scheduled
- Priority: high

Event Room 1:
- Room: Room 225,226,211
- Capacity: 45
- Is Primary Room: ✓

Event Instructor 1:
- Instructor: Md. Ajiarul Islam Miraj
- Role: Invigilator
- Is Primary: ✓
Exam 5: SE 407 - Web Database Programming
Event Details:
- Title: SE 407: Web Database Programming
- Event Type: exam
- Course Offering: SE 407 (Batch 59)
- Date: 2025-12-13 (Saturday)
- Start Time: 09:30
- End Time: 12:00
- Status: scheduled
- Priority: high

Event Room 1:
- Room: Room 225,226
- Capacity: 35
- Is Primary Room: ✓

Event Instructor 1:
- Instructor: Md. Ataullah Bhuiyan
- Role: Invigilator
- Is Primary: ✓
Afternoon Exam Slot (01:00-03:30pm):
Exam 6: CSE 3217/317 - Computer Networks and Security
Event Details:
- Title: CSE 3217/317: Computer Networks and Security
- Event Type: exam
- Course Offering: CSE 3217 (Batch 62)
- Date: 2025-12-13 (Saturday)
- Start Time: 01:00
- End Time: 03:30
- Status: scheduled
- Priority: high

Event Room 1:
- Room: Room 311,312
- Capacity: 55
- Is Primary Room: ✓

Event Instructor 1:
- Instructor: Sabbir Hossen
- Role: Invigilator
- Is Primary: ✓
Exam Scheduling Best Practices
Time Slots: Use consistent time slots
- Morning: 09:30-12:00
- Afternoon: 01:00-03:30
- Evening: 02:00-04:30
Room Assignment:
- Assign rooms based on batch size
- Consider room capacity
- Multiple rooms can be assigned to one exam
Invigilator Assignment:
- Assign course teacher as primary invigilator when possible
- Add additional invigilators for large batches
- Ensure no scheduling conflicts
Batch Organization:
- Group exams by batch and course
- Avoid scheduling conflicts for students
- Consider room availability
Metadata Usage:
- Store additional info in the metadata JSON field
- Examples: special instructions, materials allowed, exam format
Data Flow Summary
Creating a Complete Class Schedule
1. Create Department (e.g., CSE)
   ↓
2. Create Course (e.g., CSE 3215 - OOP)
   ↓
3. Create Batch (e.g., Batch 65)
   ↓
4. Create Section (e.g., Section B)
   ↓
5. Create Instructor Account + Profile
   ↓
6. Create Course Offering
   (Links: Course + Batch + Section + Teacher + Academic Year)
   ↓
7. Create Routine
   (Uses: Course Offering + Day + Time + Period)
   ↓
8. System automatically generates Events from Routine
Creating an Exam Schedule
1. Ensure Course Offering exists
   ↓
2. Create Building and Rooms (if not exists)
   ↓
3. Create Instructor Accounts (for invigilators)
   ↓
4. Create Event (type: exam)
   (Links: Course Offering + Date + Time)
   ↓
5. Create Event Room
   (Links: Event + Room)
   ↓
6. Create Event Instructor
   (Links: Event Room + Instructor)
Tips and Troubleshooting
Common Issues
Issue: Cannot find Course Offering in dropdown
- Solution: Ensure you've created the Course Offering first
- Check that course, batch, section, and teacher all exist
- Verify the academic year is set
Issue: Routine not generating events
- Solution: Check that routine is marked as "Active"
- Verify effective dates are correct
- Ensure course offering is valid
Issue: Cannot assign instructor to exam
- Solution: Ensure instructor account exists with role "instructor" or "admin"
- Check that instructor profile is created
- Verify no scheduling conflicts
Best Practices
Naming Conventions:
- Routines:
COURSE_CODE Day Type(e.g., "CSE 3215 Monday Lecture") - Events:
COURSE_CODE: Full Name(e.g., "CSE 2115: Object Oriented Programming")
- Routines:
Data Entry Order:
- Always create in hierarchical order: Department → Course → Batch → Section → Course Offering
- Create instructors before assigning them to courses
- Create venues before scheduling exams
Verification:
- After creating routines, check the Events tab to verify generation
- Review exam schedules for conflicts
- Verify room capacities match batch sizes
Maintenance:
- Regularly update instructor profiles
- Archive old course offerings
- Clean up inactive routines
Additional Resources
Support
For technical issues or questions:
- Email: foysal.developer@gmail.com
- Check the project README for more information